Fly Tying - Patterns and Tips
- Animal Chris
- TKF 4000 Club

- Posts: 4485
- Joined: Fri Jun 13, 2003 8:06 am
- Location: Nassau Bay & Lake Buck Canon (Tow), USA
Fly Tying - Patterns and Tips
Many of you have asked for a spot to post fly patterns and tying tips so they don't get lost deep down in the archives. So, here you are but, here are a few general guidelines for you to follow:
1) This spot is for fly recipe and tying tips only.
2) Feel free to post any pattern or fly type you would like to share with the rest of the board members.
3) Try to keep your instructions and photos to a minimum.
4) If you want to start a discussion or comment on a particular topic, please do so in a separate thread or through the personal mail.
5) When posting, please follow the rules of the Board
6) Check this thread from time to time for changes and updates.
Thanks and let’s get to tying! AC
Re: Fly Tying - Patterns and Tips
Alright, ill start this off... heres a puglisi redfish critter i tied this morning. #4 with orange thread, 2 rabbit strips and some ep crustacean dub. Super easy to tie. Ill post a bunch more flies tonight. Post up some flies everyone. This is for a reference/data base for flies to help with ideas for everybody to use.
- flatzstalker
- Posts: 117
- Joined: Thu Mar 18, 2010 8:39 am
Re: Fly Tying - Patterns and Tips
cool crab ............
Re: Fly Tying - Patterns and Tips
Some more for the archives... ep pinfish: ep fibers (colors are your choice, #2 hook, and holographic eyes. All you need to do is start with a tuft of red fibers and tie in the middle of the shank (in this case i used white and colored it red with permanent marker) this will create a red gills/guts effect. then from the back/tail, take a 2 inch strip of ep fibers and tie it at the middle of the fiber strip, making sure the strip is on the top of the hook only! then thake the half thats facing forward and flip it over against the half facing backward and tie it down. then alternate by tying a different color for the bottom doing the same thing: tie down the middle, flip forward facing fibers over and tie down again. continue to do this till you get to the front. spread fibers out (not smoosh them down) and trim. add eyes and youre done. NOTE: do not use too much fibers. with ep fibers, very very little goes along way. i posted a tutorial on this previously complete with pics, just search redfish slider and it should pop up. craft fur (used to use deer hair but this will make it flip upside down if not weighted correctly), brown/natural hackle, silver flash, mono for eyes, clear cure goo, #4 or 6 hook, and sally hansens hard as nails. this still needs perfection when tying hook up (50% success rate) but for hook down and weed guard, the steps are: HOOK FACING DOWN, take a peice of hackle and holding the bottom stem cut straight accross the middle. then make another cut about 1/3 to 1/2 of an inch below that and you should have a large peice that looks like a triangle. take this peice and tie it to the bottom of the hook by the eye. this will be your tail. be sure to tie it in a way to make the tail face down so that your fltline does not interfere with the fly itself. next make barbell eyes with mono (i used 50 lb mono for these) and tie on top of shank. then inside the hook just behing the eyes you will tie in craft fur for the legs. nest tie some silver flash on top of the hook behind the eyes. place a slightly larger than small (medium?) size bead of CCG on top of the eyes, hold the flash into the CCG and cure it. this will keep the flash pointing forward as well as anchor the eyes down even more. now take one of the peices of waste hackle from the tail you made earlier and snip at the rachis only(the spine of a feather) to where the rachis is only about 1/4 to 1/3 of an inch long. this should give you a "V: shaped feather. place a small bead of CCG on the previously cured CCG and place the cut hackle on top and tie down. this will make the shrimp look like it has devil horns. cure the ccg so it holds down the horns. now take a new peice of hackle, snip off the large part if the rachis leaving you about a 4 inch peice of hackle left and tie in the bottom behind where you tied your legs in. wrap the hackle around the shanks and when you get to the tail (or run out of hackle) tie it off and whip finish. give the hackle a buzz cut by snipping the top so that the hackle only points down. go ovewr the fly and trim wherever else you feel needs trimming (legs, horns, etc.) place an application or two of CCG along the area of hackle you just trimmed for the carapace making sure to connect it to the head as well. after curing, brush some sally hansens hard as nails over the ccg for a more glass-like effect and your finished. i will post a video of the tutorial when my new memory card comes in and post a link here hopefully within a week.
Last edited by jimithing on Mon Apr 11, 2011 12:01 am, edited 1 time in total.
Re: Fly Tying - Patterns and Tips
[attachment=1]IMAG0102-1.jpg[/attachment]
Re: Fly Tying - Patterns and Tips
Some spoon flies...[attachment=1]IMAG0295-1.jpg[/attachment]
Re: Fly Tying - Patterns and Tips
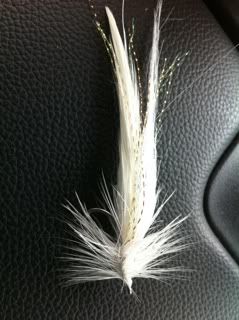
Ol faithful...

Re: Fly Tying - Patterns and Tips
I love those spoon flies a few posts up, those look awesome! Thank you for posting your flies on here, the tutorial/instructions u have posted in the past have been invaluable to me since i am new to all of this.
Russ
Russ
Re: Fly Tying - Patterns and Tips
Shareing your ideas and flies is most appreciated. I'll try to tie up a few of them beginning tomorrow.
Re: Fly Tying - Patterns and Tips
It has been requested that this fly be posted in here....
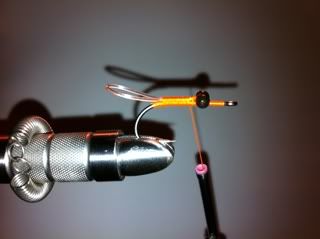
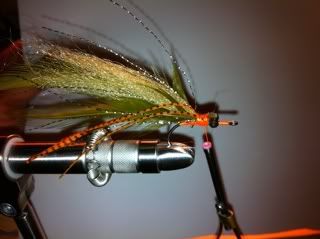
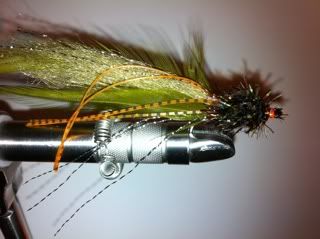
It is supposed to produce something like this....
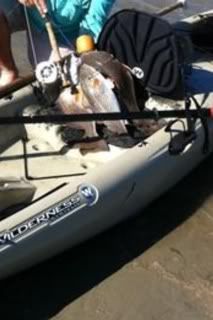


It is supposed to produce something like this....

Re: Fly Tying - Patterns and Tips
heres a video tutorial i made to the redfish critter fly... http://www.youtube.com/watch?v=XjdQRh7Apu8" onclick="window.open(this.href);return false;
- Midcoast Mark
- TKF 1000 Club

- Posts: 1133
- Joined: Mon Jul 10, 2006 1:33 pm
- Location: Carancahua / Houston
Re: Fly Tying - Patterns and Tips
Those aren't flies, they are art!!
Thanks for posting.
My flies have two common themes:
1. clouser types (could be about anything with barbells, bead chain, etc. with a fishy pattern behind)
2. butt-ugly fur balls/chenille monsters (these include "crab flies," cactus chenille shrimp, etc.)
Luckily, they still seem to catch fish!
And thanks for reminding us that a seaducer will always find fish!
- Ron Mc
- TKF 5000 Club

- Posts: 5722
- Joined: Fri Jan 20, 2006 6:12 pm
- Location: downtown Bulverde, Texas
- Contact:
Re: Fly Tying - Patterns and Tips
Cat's Whisker
Hook: 2x-long or 3x-long streamer hook, size 8 or 10 (I use Tiemco 5263)
Thread: to match body
Accent: Krystal Flash
Tail: marabou
Body: medium chenille
Wing: arctic fox (I like the arctic fox zonker strips best) or marabou
Eyes: bead chain pair
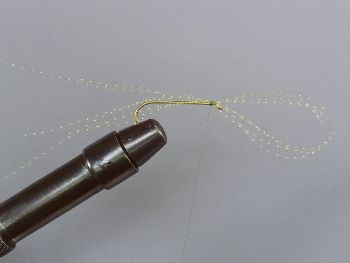
Start the thread at the eye, and tie in 3 to 4 strands of Krystal Flash to tail length using a few wraps.
Make a long loop forward by bringing the other ends back and adding to the tail. Leave the loop hanging over the eye for now.
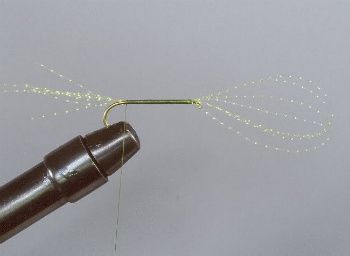
Lightly pull the tail strands as you finish the base thread wrap to the back of the hook, wrapping over the Krystal Flash.
For maximum flash, clip the tail strands to uneven lengths.
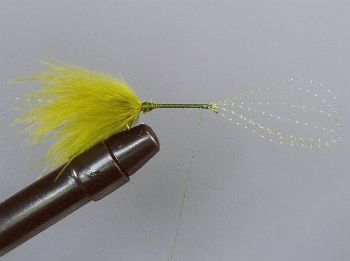
Tie in the marabou tail over the strand ends. (I cut 3 equal stem segments from the center of the feather, and twist these together.
I throw away the bottom and save the tip for smaller flies.)
Make 5 to 6 thread wraps on the marabou before you twist and clip the tag. Then wrap some more.
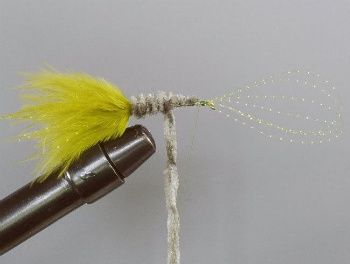
Tie in the body chenille. While your chenille wrap needs to be from the back forward, I start by bringing the thread forward,
tie in the chenille, pull the tag back, and lightly cinch a length of chenille down the hook shank to add body thickness.
Make 3 good thread wraps at the back and bring the thread forward again before you wrap the chenille forward.
Tie off the chenille about 1/8-inch behind the eye, and trim.
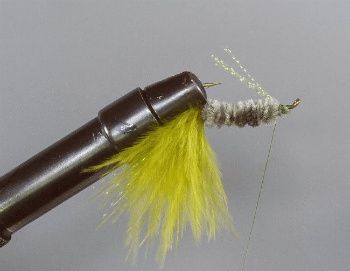
Here, I turn the fly around to the bottom of the vise jaw to simplify tying in the wing.
Pull the Krystal Flash loop back past the hook point and make enough thread wraps to hold it back. Trim it just behind the hook point.
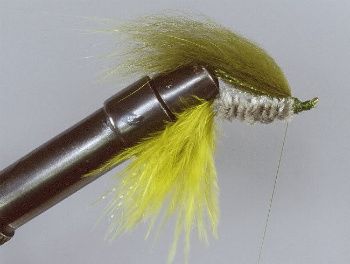
Tie in a wing of arctic fox over the Krystal Flash. (I cut 1/4-inch or so from the strip and twist the fur.)
Try to make the wing length close to the end of the tail. Don't pull too hard when you trim the tag or the wing will pop out
from your thread wraps. (Here again, I turn the fly back to the top of the vise jaw to simplify tying in the bead chain.)
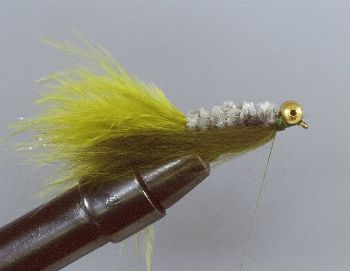
Tie a bead-chain pair on the outside of the hook shank using figure-8 wraps. Build up many wraps of thread in the figure-8's
and behind the chain bead.
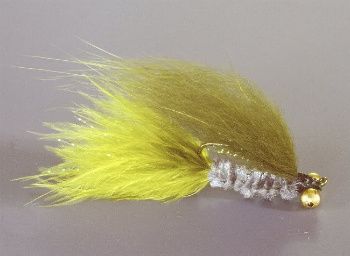
Whip finish behind the bead-chain. Apply head cement on all the thread.
By Ron McAlpin
I tie this fly for stripers and salt using a 4x-long size 6 stainless hook, and large stainless bead.
For the tail I start with a pair of saddles, then cover those with a pair of full marabou blood feathers.
Like a Clouser, this is one fly that will catch everything.
It's also a very good fly to learn tying with - and you'll catch fish right off.
warmwater fly patterns - http://www.warmfly.com/smf/index.php?board=14.0" onclick="window.open(this.href);return false;
Hook: 2x-long or 3x-long streamer hook, size 8 or 10 (I use Tiemco 5263)
Thread: to match body
Accent: Krystal Flash
Tail: marabou
Body: medium chenille
Wing: arctic fox (I like the arctic fox zonker strips best) or marabou
Eyes: bead chain pair

Start the thread at the eye, and tie in 3 to 4 strands of Krystal Flash to tail length using a few wraps.
Make a long loop forward by bringing the other ends back and adding to the tail. Leave the loop hanging over the eye for now.

Lightly pull the tail strands as you finish the base thread wrap to the back of the hook, wrapping over the Krystal Flash.
For maximum flash, clip the tail strands to uneven lengths.

Tie in the marabou tail over the strand ends. (I cut 3 equal stem segments from the center of the feather, and twist these together.
I throw away the bottom and save the tip for smaller flies.)
Make 5 to 6 thread wraps on the marabou before you twist and clip the tag. Then wrap some more.

Tie in the body chenille. While your chenille wrap needs to be from the back forward, I start by bringing the thread forward,
tie in the chenille, pull the tag back, and lightly cinch a length of chenille down the hook shank to add body thickness.
Make 3 good thread wraps at the back and bring the thread forward again before you wrap the chenille forward.
Tie off the chenille about 1/8-inch behind the eye, and trim.

Here, I turn the fly around to the bottom of the vise jaw to simplify tying in the wing.
Pull the Krystal Flash loop back past the hook point and make enough thread wraps to hold it back. Trim it just behind the hook point.

Tie in a wing of arctic fox over the Krystal Flash. (I cut 1/4-inch or so from the strip and twist the fur.)
Try to make the wing length close to the end of the tail. Don't pull too hard when you trim the tag or the wing will pop out
from your thread wraps. (Here again, I turn the fly back to the top of the vise jaw to simplify tying in the bead chain.)

Tie a bead-chain pair on the outside of the hook shank using figure-8 wraps. Build up many wraps of thread in the figure-8's
and behind the chain bead.

Whip finish behind the bead-chain. Apply head cement on all the thread.
By Ron McAlpin
I tie this fly for stripers and salt using a 4x-long size 6 stainless hook, and large stainless bead.
For the tail I start with a pair of saddles, then cover those with a pair of full marabou blood feathers.
Like a Clouser, this is one fly that will catch everything.
It's also a very good fly to learn tying with - and you'll catch fish right off.
warmwater fly patterns - http://www.warmfly.com/smf/index.php?board=14.0" onclick="window.open(this.href);return false;
Re: Fly Tying - Patterns and Tips
heres a bunch of stuff ive been working on lately, or least that i have taken pictures of (trust me, theres tons more)...
tied on a no 6, tie in some bucktail and crystal flash. then tie in bead chain eyes (the larger, the better for weight purposes), and then some strands of silli legs. then spin in 2-3 clumps of deer hair and trim to your liking. tied on a no 4, with hook pointed down, take about 2.5-3 inches of ep fibers (and sparingly, less is more with this fly. if you think you dont have enough, use half of that) and starting from the back and on top of the hook, tie the fibers right at the middle so forward half points to the eye and the back half points in the direction of the bend. when you tie it on make 4-5 turns of your thread tying towards the bend of the hook. then flip the forward half of the fibers to the rear and make a few wraps towards the front. flip the fly over and do the bottom exactly the same. continue until you get near the eye alternating colors if youd like, and whip finish. glue on 3d eyes and either glue your knot or use nail polish and let dry. this is my wooly adams version of the adams fly. tied on no 12 dry fly hook, take several peices of elk hair (or deer hair) and tie them in at the bend to make a tail. next tie a long strand of ostrich plume and let hang, this will be dubbed in after the next step. next take a small amount of fine dubbing fur and twist it onto your line and tie in your dubbed line towards the eye. now take the ostrich plume and twist it on over the dubbing until you get 3/4 across the hook and tie it down.take one good strip of whiting hackle and let hang for palmering after next step. now take the ends of two whiting feathers/hackle and tie in to look like wings of a fly after you tie wings in, palmer the hanging hackle and tie off. tie some thread near the eyes to give and appearance of a head (but not too much) and whip finish 2-3x. try not to use glue or epoxy as it will weigh down the fly.
tied on a no 6, tie in some bucktail and crystal flash. then tie in bead chain eyes (the larger, the better for weight purposes), and then some strands of silli legs. then spin in 2-3 clumps of deer hair and trim to your liking. tied on a no 4, with hook pointed down, take about 2.5-3 inches of ep fibers (and sparingly, less is more with this fly. if you think you dont have enough, use half of that) and starting from the back and on top of the hook, tie the fibers right at the middle so forward half points to the eye and the back half points in the direction of the bend. when you tie it on make 4-5 turns of your thread tying towards the bend of the hook. then flip the forward half of the fibers to the rear and make a few wraps towards the front. flip the fly over and do the bottom exactly the same. continue until you get near the eye alternating colors if youd like, and whip finish. glue on 3d eyes and either glue your knot or use nail polish and let dry. this is my wooly adams version of the adams fly. tied on no 12 dry fly hook, take several peices of elk hair (or deer hair) and tie them in at the bend to make a tail. next tie a long strand of ostrich plume and let hang, this will be dubbed in after the next step. next take a small amount of fine dubbing fur and twist it onto your line and tie in your dubbed line towards the eye. now take the ostrich plume and twist it on over the dubbing until you get 3/4 across the hook and tie it down.take one good strip of whiting hackle and let hang for palmering after next step. now take the ends of two whiting feathers/hackle and tie in to look like wings of a fly after you tie wings in, palmer the hanging hackle and tie off. tie some thread near the eyes to give and appearance of a head (but not too much) and whip finish 2-3x. try not to use glue or epoxy as it will weigh down the fly.
Re: Fly Tying - Patterns and Tips
with no 2 or 4 hook pointed down, tie in several wraps of lead wire in center of hook. next tie in some colored craft fur on top and some white craft fur on the bottom (belly). feel free to use any flash desired. next take several good clumps of elk hair (or sub with deer hair) and spin on. trim slightly (for managability) and repeat until you get to the eye. using very sharp scissors or a razor, trim the head in the shape of a minnow or mullet, leaving alone the back strands of deer hair to help with pushing water. take a bodkin and cauterize the spots you want to place eyes and super glue in eyes.
this is just something i made taking a bunch of scraps of feather and even a peice of foam that would have otherwise been thrown away and making something out of it. actually caught some bluegill on this one.
easy popper type fly, using the size hook desired, tie on 30lb mono down the upper half of the hook bend for a weed guard. let the other side hang. tie on some silli legs and spin 3 clumps of deer hair. tie in the last half of the 30lb mono weed guard near the eye and whip finish. glue a peice of foam in for a mouth, glue in eyes and color with a magic marker accordingly.
Re: Fly Tying - Patterns and Tips
no 6 hook, tie in some flash and some white craft fur. next tie in some beaded eyes on mono. now tie in one side of a peice of foam over the eyes. next palmer in some hackle and tie down the foam in 3-4 sections and whip finish. make sure theres enough tail/foam at the eye so when you whip finish, the some foam that sticks up to make the gurgling effect.
i may have to post a video or a tutorial later, it pretty long/time consuming. but basically it a 2 hooked chugger using rabbit strips and other materials with a foam head
simple grass shrimp that uses mono eyes as a weedguard. easy to figure out.
Re: Fly Tying - Patterns and Tips
use any hook size desired and any weight if desired, tie in some white craft fur. next tie in over the craft fur either silver flash or thick crystal flash. now near the eye of the hook tie in some thick crystal flash and wrap several times to make a good nose and whip finish and glue. for the eyes i used these little body jewelery things you can find at a craft store. glue those on. i love these eyes because they really flash when in the water.
similar to the adams except the deer hair pints up to help fly stay afloat.
same as the tan minnow above, except i used a green rabbit strip and a white rabbit strip sandwhiched/glue together at the skin instead of craft fur.
Re: Fly Tying - Patterns and Tips
pretty same as green chugger, its a two hook style chugger with foam head. will post something on this in near future
Re: Fly Tying - Patterns and Tips
Skittal shrimp- tied on no 4 or 6, uses white rabbit strip, crystal and copper flash, orange and white silli legs, orange maribou for eggsack, white ep fibers, 1/60 or 1/80 dumbell weight, 30 lbs mono for eyes and weedguard (optional), and red beads for eyes.
- FlatsYakker
- Posts: 150
- Joined: Sun Jul 10, 2011 8:06 pm
- Location: Boerne
- Contact:
Re: Fly Tying - Patterns and Tips
I'm just getting back into coastal flyfishing after a 10-year hiatus. I caught more reds and trout on Dan Blanton's Sar-Mul-Mac pattern by far than on anything else. On a 1/0 or 2/0 hook it's a red, trout, and flounder killer; on a 3/0 it's great on wahoo and mahi-mahi; on a 4/0 it's a billfish killer. You just increase the length of your materials for the various baitfish you're imitating.
http://www.danblanton.com/sarins.html" onclick="window.open(this.href);return false;
There's the step-by-step visuals of the pattern. It's easier than it looks. Most of the commercially available ones are 3/0 with primarily blue (mackerel) tinge to them. I used the grizzly (mullet) look and always did well with trout and reds from Mansfield to Port A.
If you tie up several Sar-Mul-Macs in 2/0 before your next trip to the coast inshore (or in 3/0 for offshore) you'll swear by this pattern from now on.
Re: Fly Tying - Patterns and Tips
thanks for that contribution boerne. but i may have to with do without the grizzly hackle. that stuff is selling like hot cakes and pretty hard to find.
Re: Fly Tying - Patterns and Tips
Do yall tie bend backs.
